The view editor supports all features of view resources. You can have up to 16 loops, 32 cels (in each loop), any width/height and a description. You can also copy and paste images from the clipboard.
For more information on view resources, click here.
To use the view editor, simply double-click on a view resource in the main window or select 'View Editor' from the 'Tools' menu or toolbar. You can have several view editor windows up at a time.
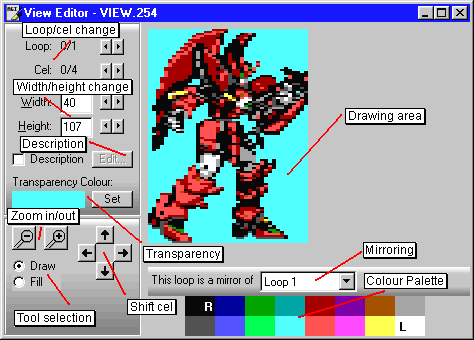
The view editor looks like this:
Drawing area
This is pretty self explanatory. You can draw in either selected color using the left or right mouse button.
Color Palette
This allows you to select drawing colors. You can assign colors to the left or right mouse button by clicking that button on the appropriate color.
Loop/cel change
The current loop and cel are displayed here. Click the left/right buttons to change loops/cels.
Width/height change
This is the width and height of the current cel. Note that the image is 2*width pixels wide on the screen as each AGI pixel is two normal pixels wide. To change the width or height, click on the
appropriate buttons or type in a new value.
The maximum cel size is 160x168 (the size of the AGI playing screen).
Zoom in/out
You can zoom in or out of the view to a maximum of 10x. The default zoom is 2x.
Tool selection
This allows you to select the tool you want to use in the drawing area.
Shift cel
You can shift the cel up, down, left or right using these buttons. When you do this you will lose the part of the cel that goes off the drawing area.
Mirroring
To mirror a loop, just select the number of the loop you want to mirror. Note that when you do this, you lose the current loop and it is replaced with the mirror of the other loop. Always make sure
that you change to the "target" loop before doing this.
When loops are mirrored, any change you make to either loop will be replicated in the other. When you select "No other loop", the cels in both loops remain the same but you can now modify them independently.
Transparency
Clicking the "set" button will change the transparent color of this cel to the color that is assigned to the left mouse button.
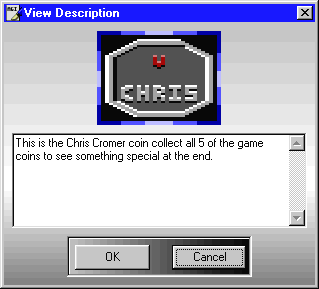
Description
If you want a description, check the description check box and click the 'Edit' button to edit or change it. Note that lines are separated by "\n". The description editor looks
like this:
These keys can be used with the view editor:
| Q | previous loop |
| W | next loop |
| A | previous cel |
| S | next cel |
| Z | zoom out |
| X | zoom in |
| T | set transparent color |
| D | select draw tool |
| F | select fill tool |
| I | shift cel up |
| K | shift cel down |
| J | shift cel left |
| L | shift cel right |
| CTRL-C | copy cel |
| CTRL-P | paste cel |
At present, the undo feature is not available for inserting/appending/ deleting/clearing loops or cels, mirroring/unmirroring loops or pasting cels. If you perform one of these actions, the undo buffer will be cleared. I hope to have undo available for all actions in future versions.
The reason pasting of cels from the clipboard is slower than it should be is that the program has to convert a 24-bit image to a 16-color image by picking the closest EGA color for every pixel. This is so you can import an image from another program that doesn't use exactly the same palette as AGI Studio. In future versions I hope to speed this up when pasting cels copied to the clipboard within the program.
When using the right mouse button for drawing, when you go off the edge of the
drawing area and come back again you will get a line from the point where you
left to the point where you re-entered.